Stop resizing AI models. Set your printer config once.
You know the loop. You type "generate a cable management box" into an AI tool. It spits out a model. You download it, open your slicer, and the thing is 400mm wide. Your bed is 220mm. So you go back, type "make it smaller, my bed is 220x220mm." New model. Open slicer. Now it's 219mm but the walls are paper thin because the AI just scaled everything down uniformly. The internal clearances are shot. The snap-fit clips that were supposed to click together now have 0.02mm gaps.
You do this three, four, five times. By the end you've spent more time negotiating dimensions with a chatbot than it would have taken to just model the thing from scratch.
I got tired of watching this happen. So we built Generation Settings.
What it does
Generation Settings is a configuration panel where you define your printer's constraints once. Bed dimensions, part clearance, preferred generation mode, filament colors, and standing instructions. After you save, every single generation on GrandpaCAD automatically respects those constraints. You don't mention them in your prompt. You don't remind the AI. It just knows.
There are five categories of settings, and they all work together.
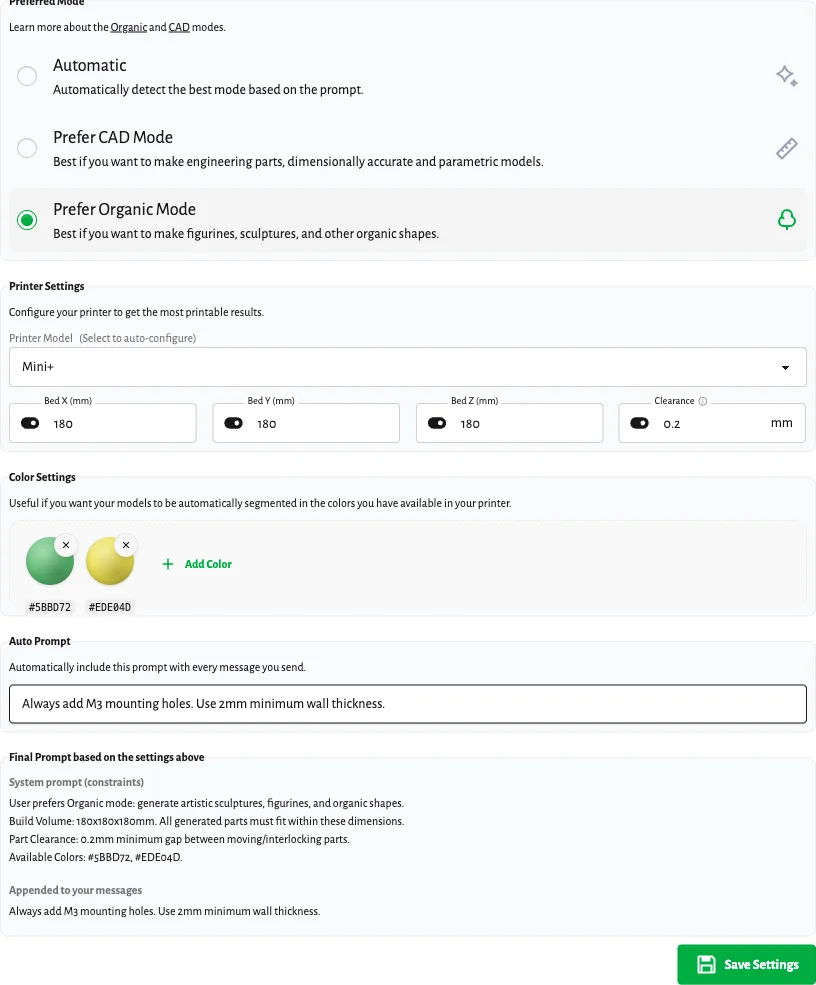
Preferred mode
GrandpaCAD has two generation modes: CAD (for engineering parts, parametric, dimensionally accurate) and Organic (for figurines, sculptures, artistic shapes). By default, an AI router reads your prompt and picks the best mode automatically. "M8 bolt" goes to CAD. "Cute dragon figurine" goes to Organic.
But if you mostly make functional parts, you can lock it to CAD mode. If you're printing figurines all day, lock it to Organic. This skips the routing step entirely and the AI focuses its full context on the type of generation you actually want.
Read more about Organic Mode if you haven't tried it yet.
Printer configuration
This is the one that solves the resizing loop.
We ship 30+ printer presets covering Creality, Bambu Lab, Prusa, Elegoo, Anycubic, Voron, and Flashforge. Select your printer from the dropdown and the bed dimensions and clearance auto-populate. If your printer isn't listed, or you've got a custom build, type the numbers in manually.
Here's a concrete example. Say you've got a Bambu Lab A1 Mini. You select it from the preset list. The fields fill in: 180 x 180 x 180mm build volume, 0.15mm clearance. You hit save.
Now when you ask GrandpaCAD to "generate a desk organizer with three compartments and a phone slot," the AI knows it has to fit inside a 180mm cube. It won't generate a 300mm wide organizer and tell you to scale it down. It designs to your constraints from the start. The compartments, the phone slot, the wall thicknesses, all sized to work on your specific printer.
The enforce toggle lets you turn bed size constraints on or off without deleting your printer config. Maybe you're designing something you plan to print on a friend's larger machine. Toggle it off, generate, toggle it back.
Clearance
Clearance is the minimum gap between moving or interlocking parts. If you've ever printed a snap-fit case where the lid was supposed to click on but was too tight (or too loose), this is the setting that fixes it.
The default is 0.2mm, which works well for most FDM printers with 0.4mm nozzles. If you're running a finely tuned Voron or a resin printer, you might drop it to 0.1mm or even 0.05mm. If your Ender-3 has some play in the belts, bump it up to 0.25mm or 0.3mm.
When the AI generates interlocking parts (hinges, boxes with lids, clips, dovetails), it uses your clearance value for the gaps. No more guessing. No more "make it 0.2mm looser."
Colors
If you've got a multi-material setup (AMS, MMU, or just multiple filament rolls you swap manually), you can define exactly which colors are available. Click "Add Color", pick from the palette, repeat for each spool loaded.
When you generate a model, the AI knows your available palette. Ask for "a red and white lighthouse" and if you've got red and white defined, it'll segment the model into those two materials. If you've only got blue and white, it'll adapt.
This ties directly into our multi-color 3D printing pipeline. The generation and the color segmentation are both informed by your color settings.
Auto prompt
This is the simplest setting and maybe the most powerful for repeat workflows. It's a text field where you write standing instructions that get appended to every message you send.
Some examples of what people put here:
- "Always add M3 screw holes for mounting"
- "Use 2mm wall thickness minimum"
- "Design for FDM printing, avoid overhangs greater than 45 degrees"
- "Include a flat base on every model"
If you find yourself typing the same constraints over and over, put them in auto prompt and forget about them.
Under the hood
I want to be transparent about what's happening technically. Your settings get converted into a system prompt fragment that the AI sees before every generation. Here's an actual example of what gets injected when you've configured a Bambu Lab A1 Mini with 0.15mm clearance and red + white filament:
Build Volume: 180x180x180mm. All generated parts must fit within these dimensions.
Part Clearance: 0.15mm minimum gap between moving/interlocking parts.
Available Colors: #ff0000, #ffffff.
That's it. No magic. The AI reads this as context before generating your model. The manual prompt you write in "Auto Prompt" gets appended separately to your actual message, so it stays in the user context rather than the system context. This separation prevents any instructions in the auto prompt from overriding safety constraints.
You can see the full generated prompt in real time at the bottom of the settings panel. As you change settings, the preview updates. What you see is exactly what the AI sees.
Why this matters for iteration
The real payoff isn't just the first generation. It's every generation after that.
Without settings, every new chat is a blank slate. The AI doesn't know your printer, your clearances, or your color setup. You either type it all out every time or you accept generic output and fix it later.
With settings, every new chat inherits your full printer configuration. You can jump straight to "cable clip that holds three USB-C cables" without preamble. The AI already knows it needs to fit on your 220mm bed, use 0.2mm clearance for the clip mechanism, and that you have black and gray filament.
Over a dozen generations, that saves you hundreds of words of repeated prompting and multiple resize-and-regenerate loops. The models come out closer to printable on the first try.
Get started
Head to your settings page and configure your printer. It takes about 30 seconds if you pick a preset, maybe a minute if you're entering custom dimensions. Every generation from that point forward will respect your configuration.